Saturday 26 March 2016

Happy Easter and another bunny

Hello Crafters,

Just a very quick note from me:  one of my girls was ill last week, therefore I had no time for anything much. But at least I created another one of the little gift wraps, because as you know, I have two daughters...

So I did the other one the same way, only in different colours and stamped the other way round.


Wishing you all a very happy Easter!
Ela

Sunday 20 March 2016

Challenge up your life: Challenge #37: Bunnies

Hello Crafters,

it's time again for another Challenge at: 


Ready for Easter, we are looking for Bunnies for the next two weeks.


Challenge #37 Bunny


Of course I used my favourite Bunny, from Purple Onions Design, and I wanted to use my brand new set of  Polychromos pencils. Yeah, I know, I said I would make do without. But my sister-in-law gave them to me for my Birthday a while ago. And I love them, THANKS!


I thought a little gift box for Easter would be nice, so I picked a bright orange card stock, die cut the pillow box and stamped and coloured directly on the box, without a belly band this time.

I thought blue would go well with the bright orange, and I think I was right.


So, show us all your bunnies, and don't forget to check out what the other ladies created.

Hugs
Ela  

Friday 18 March 2016

Wild horse

Hi Crafters,

today I have an entirely handmade card to show you. My daughters are invited to a birthday party tomorrow, and their friend likes horse riding. So I wanted to create a card with a horse. But I didn’t have a suitable stamp and didn’t find a digital image I liked. So I decided to try my watercolour skills.

It didn’t turn out the way I had imagined it, so when I was done I didn’t like it at all and went to bed rather frustrated. The mane is rather a bit too wild, and I had imagined more shadows and structure on the face, but didn’t dare paint them in.

But when I saw it the next morning, I thought it wasn’t all that bad. Rather messily painted, but still recognizable as a horse and watercolour needn’t be perfectly realistic. I like it after all. And I think so will the Birthday child.

I decided to keep the card simple and not even use a sentiment. I thought maybe she'd like to keep the image and that way she can frame it without the sentiment spoiling the effect.


Have a nice week-end
Ela

Challenges:
Seize the Birthday: Anything goes Birthday
(Hope that's ok, even without a Birthday sentiment, because it is intended as a Birthday card)

Saturday 5 March 2016

Challenge up your life: Challenge #36 Die Cutting

Hello Crafters,

welcome to the new Challenge at

This time we are challenging you to use one of my favourite techniques:


Challenge #36 Die Cutting


I love die cutting, you can create all kinds of cool effects with it. For this challenge I wanted to use a die that I actually had for a year and never used. Having disregarded it so long, I now really wanted to put it to work...


So I went for an inlay background grey on white and white on grey. That was one fiddly bit of work, whatever made me go for inlaying with such an intricate die? I must be losing it...

When it was all done I had two panels and no idea of how I wanted to continue. Besides I didn't like the backgrounds as much as I had thought, so I wanted to cover up a bit of them, but not too much.

I found a gorgeous digital stamp of a robot with a balloon - robots being the obvious choice with the clockworks - but unfortunately it was out of sale.
Looking for an alternative, I found myself a great collection of digital stamps at Prettygrafikdesign, with some very cute toy robots and combined them with some balloon stamps I had in my collection.

I coloured all images with water colour pencils, doing only very simple shading. Then I fuzzy cut them out and adhered them with foam tape.

I placed both robots on a strip of coloured card stock to ground them. The red one is water colour paper, coloured with the same pencil I used on the robot and balloon. And the green is a just normal green card stock, but layered with a torn strip of vellum on which I heat embossed the sentiment. 

I picked Birthday sentiments for both cards to go with the cheerful balloons. Besides you can never have enough Birthday cards. As I make my cards for friends and family I gravitate towards German sentiments whenever I can.

To finish them off, I added strings and Glossy Accents to all of the balloons and adhered the front panels to coloured card bases (grey and green). I like the little surprise, when you open the card, and the inside is in an unexpected colour.


Now, go ahead and create a project using your dies. And please also check out what the rest of the design team created. Those ladies are so talented!

Have a nice week-end
Ela


Challenges:
Seize the Birthday: No toppings
Laura's Loft: Watercolour

Tuesday 1 March 2016

Thank you card

Hello crafters,

I found a photo of a card on my phone, that I hadn't posted yet. The photo was taken in the car, just before we gave away the card, because I had forgotten to take one at home. So please excuse the background...


I love this image it reminds my so much of one of my daughters and her obsession with her teddy. That is the only reason why I bought that sleepover girl's night stamp set in the first place.

I water coloured the image on water colour card stock. After it had dried, I die cut the word from yellow fun foam and from the image itself. Then I layered the two die cuts, pieced them back in and glued the whole panel to a yellow card base.

I don't think you'll be able to see it in the picture, but I also added glossy accents to the eyes, to make them shiny.


Have a great day
Ela

Saturday 27 February 2016

Sketchy condolences

Hi Crafters,

 today I'd like to show you a card that was inspired by a brilliant technique  video I saw on youtube the other day. Unfortunately today I don't remember where exactly that was, I've been searching the web for an hour. If anyone recognises the design, please let me know, so I can give credit.

I really wish I could draw, but I just don't have that talent, so I have to fake it.

I went to my local art supplies store an got two shades of grey Polychromos pencils, special for this technique. I already had a white one and I used the black outliner pencil from my Inktense set. With those I set out to try it myself.


I stamped one of the flowers of a Tim Holtz stamp set. Then I sketched in my shadow areas with a light grey at first, darkening the deepest shadows layer after layer.

At first I thought I didn't like it, but then I put it aside and looked at it with a little more distance and suddenly I did, so I decided to make it into a card.

I cut it down and used a border punch on the top edge. Then I cut an off-white card base and a black matte, also with a punched border.

For a sentiment I picked a German sympathy sentiment just because of the non-colour scheme. 

Have a nice week-end
Ela


Monday 22 February 2016

Birthday Polaroid

Hi out there,

how are you all?

I managed to squeeze in a bit of creative time last week-end, which made me really happy.

I managed to finish two cards I had started during the week for Challenge up your Life. But I can't show you these yet. 
The third card is a Birthday card I needed a for my friend's 4 year old daughter.

I had planned to do pink and glitter for her, because she has two older brothers, so she gets plenty of non-girly stuff... But when I started creating, my card somehow went in a totally different direction.


I often see those Polaroid cards, and I really like that idea, so I really wanted to make something like this for ages. I started out by picking two of my new  Purple Onion Designs stamps, the large flower and the squirrel, stamped and water coloured them with my Inktense pencils.

While the images dried, I created my own Polaroid frame and the shaker element. Then I fuzzy cut the squirrel and picked the part of the scene I wanted to show.


After the shaker was all done and closed, I started thinking about the card base, and nothing seemed to make me very happy. So, I let myself be inspired by the "Less is more" texture challenge.
I applied white embossing paste through a stencil on a white card base. That was the point when I was really unsure if this card wasn't a bit too white for a little girl. But in the end I went with it, because of the shaker and the cute squirrel.


Have a great day
Ela


Challenges:
Laura's Loft: Watercolour
Seize the Birthday: No toppings 
The daily marker: 30 days coloring challenge
Less is more: #264 Add some texture
The cat's pajamas: #308 Animals

Saturday 20 February 2016

Challenge up your life: Challenge #35 Buttons

Hi Crafters,

are you as glad as I am, that it's week-end? I seem to be constantly rushing somewhere lately, I'm really looking forward to a break. Though, to be honest, week-ends are not quiet either lately. 

Anyhow, it's Saturday and Challenge time, over at


 Our challenge this week: 

Challenge #35 Buttons


And what a challenge it was for me. Buttons don't seem to get along with me. Neither do ribbons, flowers and patterned paper, pretty much all the scrapbooky nic nacs that brought me to card making in the first place. I just don't seem to be able to use them very well. 

This time however, I am pretty content with my result. Probably because I combined them with my favourite colouring medium, my inktense pencils.


I really like those origami elefants for baby cards, but no one I know is expecting right now. Therefore I wanted to keep it gender neutral, so I picked rainbow colours, both for the elefants and the buttons. The sentiments is from one of my new efco stamp sets. It's very versatile, with a congrats (Herzlichen Glückwunsch) and then all kinds of occasions to go with it, like the birth of a baby, Birthday, Wedding, Anniversary and so on.

The heart button is actually a clear button, but I wanted it to show, so I coloured a red heart shape behind it.


Now it's your turn, go ahead and create a project with buttons. And don't forget to check out what the other design team members created!

Hugs
Ela


Challenges:
The cat's pajamas: #308 Animals
The daily marker: 30 days coloring challenge

Saturday 13 February 2016

Christmas magic

Hi all,

I've been playing with the thought of getting a set of Polychomos pencils lately, but on the other hand I tend to REALLY NEED all kinds of colouring mediums, and then end up not using them enough.

I also REALLY want a set of ZIG real brush pens, and the only reason I still don't have any is, that my orders went wrong twice. The first time I ordered them on ebay, someone hat put in the wrong picture and wrong description and actually wanted to sell entirely different pens. Well, they were too cheap to be real, so that was that.
And the second time my order was shipped from Japan but never arrived. Bright point, the money was returned to me without any trouble.

Anyhow, knowing myself and my budget, I decided not to invest in the Polychromos' yet, and try to make do with my Inktense pencils instead.

This is my first try at using them without a lot of water. I actually created that card before Christmas and already used it, which is why you can see part of the name on the envelope.  


For this card I once again used several stamp sets to create the scene. After stamping and some masking I coloured the image with the dry pencils, doing all the shading. When it was all done, I carefully used just a little water to activate the colour and blend it a bit more.

After all had dried I used the white pencil to add a few highlight and also colour in the white areas. Unlike all the other colours, the white covers best when used dry.

I really like how this card turned out. Especially the shadows look good, apart from the fact that I messed up their direction.

I also like the sentiment a lot, it's so playful.


So, that's it for today, have a great time and don't forget, only 315 days 'till Christamas.

Ho Ho Ho
Ela


Challenges:
Simon says stamp: One Layer
Less is more: #263 One Layer with a stem (hope the mushroom's stems count)
The daily marker: 30 days coloring challenge

Tuesday 9 February 2016

Birthday coffee

Hi Crafters,

last week-end, a friend celebrated his birthday. He was given a new coffee maker from his family, so we gave him the coffee beans to go with it.

Therefore I wanted a coffee themed birthday card, only I still don't have a coffee stamp set. I don't think I would use it very often if I had one. Well, this time I could have used one, but I made do without.


I started off with the sketch from Seize the Birthday for my inspiration.


Normally, so many elements scare me off, but I liked the double star and the circle reminded me of a shaker card, which in turn made me instantly think of coffee beans to go into it. So I cut out a simple coffee bean stamp from fun foam. I went ahead and stamped quite a few beans on craft card stock, heat embossed them with clear embossing powder and then fuzzy cut them out.

Then I cut the two panels from white card stock and patterned paper and created the shaker element on top of them.The sentiment is from one of my new efco stamp sets. I really like how it looks and how versatile it is. It means something along the lines of "best wishes" and I stamped it in vintage photo distress ink, like the beans. In real life, the colour pretty much matches the patterned paper too, even though it looks different on the photo.

After I tied the twine around my finished panel I decided that the craft card base looked to plain and stamped it more coffee beans. I also used the stamp to embellish the envelope and inside of the card with coffee beans. Unfortunately I once again forgot to take proper pictures before I gave away the card, so I only have the one in bad quality. 

Instead of the two stars I wanted two coffee cups, so I drew a little template on a scrap of paper and cut out both cups from the same patterned paper and adhered it to the shaker and card base.

With the ink and stamps out already, I decided to match up the gift wrapping.


Unfortunately it was for a guy, he didn't even notice, before he tore it of and threw it away. But I liked it, that's good enough. And his wife will probably find the card and keep it for a while, she usually does.

Hope you all have a great time.


Hugs
Ela


Challenges:
Seize the birthday: Sketch

Saturday 6 February 2016

Challenge #34 Without patterned paper

Hello Everyone,
 
guess what, it's Challenge time again. This week's theme is:  


Challenge #34 Without patterned paper 


over at


That's right up my sleeve, I ain't good with patterned paper anyway, so I did some colouring. And true to my intent not to let the next Christmas get as stressful as the last, this is another Christmas card.


I combined 3 different stamp sets from TAWS, Lawn Fawn and Newton's Nook, to create the frosty little mail-monster. Never hesitate to combine your stamps whichever way you like. So much more possibilities... The sentiment actually says "snail mail for you", but I cut off the "snail". "Mail for you" is so much more versatile, it can be used for almost any occasion, and I can piece it back together any time.

The colouring was done with Inktense Pencils. I really like how the shadow turned out, I think it looks like he's standing on ice.

So, grab your supplies and get started, we want to see all kinds of cards without patterned paper.

Hugs
Ela


The daily marker: 30 days coloring challenge

Thursday 4 February 2016

Crazy pink bird-day

Hi Everyone,

as you all know, life has kept me pretty busy lately, but yesterday I managed to browse through all of the Challenge blogs I love and I actually made a challenge inspired card.


When I read the Tic Tac Toe Challenge on the Paper Players I was hooked, because I am still wildly in love with Tim Holtz's birds. So that was my starting point, pink birds with bling.


From there I decided, that I wanted a Birthday card, because I always linke to play along with the Stempelküche-Challengeblog and Seize the Birthday.

When I was all done with the panel, I wanted to adhere it straight to the card, but then I remembered the Sketch at CAS Colours & Sketches.


So I went with a lose interpretation of that. I didn't cut off any edges and I added that pink piece of cardstock, but I hoped it would still be close enough.

The sentiment and black sequins are new, I got them at the local craft fair a few weeks ago. The sentiment is from a German sentiment set by Efco. They have quite a few cute little sentiment sets that are not too expensive. I only discovered them at the fair, but I think they must have been around a while now.

That's it from me for today, I hope you all have a good day.

Hugs
Ela

PS: I was too slow for CAS and Stempelküche, both Challenges were closed by the time I had my blogpost prepared...But I am not going to edit them out, I used their inspiration after all, even if the Challenges are closed by now.


Challenges:
the Paper Players: PP280 Tic Tac Toe
Seize the Birthday: No toppings
The daily marker: 30 days coloring challenge

Wednesday 3 February 2016

The great book of elves

Hi again,

Time to show you something else that kept me busy during the past weeks.
After seeing my Halloween grimoires, my friend, who is a teacher, asked me to help her create a magic fairy book, as a prop for a school musical. So I spent quite a few busy evenings, collecting ideas and developing a plan. And then many more actually creating it.

And here it is, the great book of elves:


As a basis I got an old used book, the largest I could find. Then I cut the oval in the front and about a third of the pages, to create the recess for my little fairy. If you ever try to re-create something similar, I can only advise you to use straight lines, the oval was so tough and it didn’t get as even as I had hoped…
After the cutting was finished, I covered the book with mod podge and a single layer of crumpled paper towel, to create some structure. Then I added some more structure with embossing paste and a floral stencil. I had to do that twice, the first layer wasn’t quite enough. I also adhered the die cut fun foam letters to the book.


Then I painted it all white (several layers) and brushed on green and pink, because that was the colour scheme my friend wanted. But that really didn’t look good at all, so I painted it white again. After this layer of white, the green and pink still shone through a little, but I thought that looked rather interesting, almost pearlescent. So I kept it like that and brushed on gold to bring out the structure. But that wasn't quite strong enough for the letters. Therefore I used a gold Edding to trace the letters, corners and stripes. That made them stand out much better.

I placed a green water colour background behind the window and glued the pages of the window together (mod podge again). Then I adhered some leaves, flowers, a small piece of bark and the fairy in the opening.


I also added three strings of pearls to the outside spine, to make it more magical. To do so, I fixed the strings to an elastic band with wire, pulled the elastic through the spine and then fixed the other side in the same way, under a bit of tension. Now the elastic is pulling in the string and wire, keeping them safely hidden.


After the outside was completed, I turned to the inside. As the base was a glossy paged cookery book, I really wanted to cover the pages with something.
So for a start I removed quite a few pages, to make the book less heavy, thinking of the poor child who will have to hold it up on stage. Then I chose aged looking printer paper and printed a few fairy stories on it in a font I liked, but very lightly so the print was barely visible. Then I traced all the letters with a black calligraphy fountain pen, to make it look handwritten. Next time I’d definitely just print it in black and be done with it. I don't even want to know how many hours that cost me.

Next step was to cut off all the remaining pages, leaving only a narrow strip of each, on which I adhered the new pages, covering the strip from both sides. That was much more difficult than I thought, which is why the pages don’t look as neatly as I had hoped. But after all the work I just can’t start over… So that’s deliberate, definitely…. ;) 


By now, my friend already took the book back to school to show her class, and they were all excited...

Now, have a magical day
Ela

Saturday 30 January 2016

More cards featuring Birch

Hi there,

as my last post was so long, today I'll make it really quick. Promise.

Besides, I don't really have anything new, I would just like to show you two more cards I created with Birch, pretty much the same as before.

But I love the water coloured look. The first of these two cards is also the first I ever created with these stamps.


Have a wonderful day
Ela

Tuesday 26 January 2016

Harry Potter Halloween Party

Hi Crafters,

maybe you still remember, that I promised to show my Harry Potter Halloween party decorations, as soon as my friend would send me the pictures she took. Well, I still don't have them, she's always very busy, so I decided to go ahead with the ones I took. I did not take pictures of everything, because I had planned to take them when it was all finished, but food preparations took so much longer, that the "all finished status" was reached about one hour into the party... So no time to take pictures. 

But I checked my mobile and my camera for what I had and here it is.... Sorry that some of the photos are of rather bad quality, they were never meant to go online.

First things first: the invitation card and envelope. I embossed a grey panel with a spider's web embossing folder went over the raised parts and edges with white pigment ink. Then I matted it with a lilac panel and adhered it to an orange card base. Next, I created the sentiment strip, which I adhered with foam tape. 
By the way, I didn't have lilac cards stock, so I used white and coloured it with an alcohol marker. 

The spider is a cheap plastic Halloween prop, adhered with hot glue. It's rather bulky, but none of the cards went in the mail, so who cares. 

For the envelopes I just doodled a spider on a string and a few webs. The cards were all the same, but each of the envelopes was a little different. 


Normally, our house is not open to the street, the entrance is behind a high gate, so no one can look into the garden. But for the occasion we opened the gate and decorated the cobbled front area near the entrance. There is a second, very old gate a few meters further back, which we closed instead, so the garden was still closed off.  

We carved a pumpkin, set up three store bought gravestones and lighted a few red grave yard candles around them. Although that doesn't sound all that special, it looked pretty cool. 


Inside we decorated quite a bit more. Most of the things are handmade, or altered somehow and most ideas are from the internet.

First off, a flock of hand cut cardstock bats. They cost me several evenings, but were totally worth it. 


When I found the printable Harry Potter labels  on the Internet, I instantly decided, that I need a devil's workshop. So I collected all kinds of small bottles for a while and tried to make the best of them. The ones that didn't let go of their labels easily, I painted black.


This one is hard to see, because I had to take the picture against the sun. I used heaps if small plastic spiders (the same ones I had on the invitations) and sewed them to my kitchen curtain. I also stuck some on the wall and the window pane, so it would look like they were crawling from all directions (actually only three directions) towards a little cracked hole in the window. The crack I sketched on with a white-out marker. 


My mother in law had some old white candles that had lost their form a bit over time. I made good use of them, by dribbling on red wax from another old candle around the top and letting it run down. I put them up all over the house, but unfortunately I didn't take a picture of them in place. This picture I took when I created them, to show my friend how creepy they turned out. 


For the Halloween sweets I used mason jars in different sizes. and printed out some Harry Potter sweets labels, which I didn't adhere to the jars, because I wanted to re-use them for something else. Instead I folded the labels like a place card and placed them next to each jar. 

The star among these were definitely the eye balls. I personally think they are totally disgusting, they are wobbly and look way to real for my taste. But the kids all love them. We get them for every Birthday, no matter what the motto is. 

In the jar on the second photo are jelly beans, ahem, every flavor beans. On the last picture, there are spider-lollipops, created with a lollipop, googly eyes and black pipe cleaners. 


This is one of the soap dispensers I prepared. I removed the label and somehow managed to get the plastic skeleton through the opening. That was a pretty tight fit, and it helped a lot that it was a rubbery, bendy plastic. I prepared a second dispenser with rubbery cockroaches, which creeped me out myself, every time I went into the bathroom. I really regret not having a picture to show you. 


Unfortunately there are some more pictures missing. We hung artificial spider's webs in all kinds of places, especially in the bathroom were the wall is kind of catchy and keeps the webs in place perfectly.
A  white towel with bloody hand marks was hung over the bath tub as if it belonged there. We also hung up a few Halloween lanterns and garlands and used heaps of old jam jar mummy lights to light the place. I didn't want to burn the tall bloody candles, but in the glass jars I decided open fire was safe enough.  

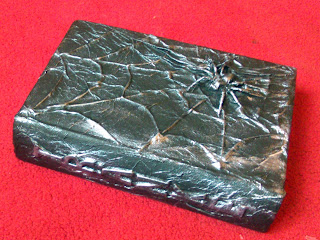
Last but not least of my party decorations, I spent weeks (a lot of drying time) creating spell books for the event. I found this idea, like so many, on the internet. I used old hardcover books, glued on plastic toys and some additional details, like the spider's web (hot glue), the corners and stipes (self-adhering magnetic tape, just because it was lying on my desk and had a straight edge) and the die cut letters (fun foam) for the titles.

When all the glue had dried, I covered the books with mod podge and a single layer of paper towel, making sure there were a lot of nice creases and wrinkles, but at the same time as much detail as possible on the plastic toys and letters.

After this was dry, I painted the books with acrylic paints (black and dark brown) and after yet more drying time I brushed on either gold or silver acrylic paint, to enhance all the details.

These are only some of the books I created, again I don't have pictures of all of them.
Later on I created even more books as Christmas gifts for my girls and their Dad. For those I used cheap empty note books and adhered the names instead of grimoire titles.
   

Right from the start I also had the idea to create "the Monster book of Monsters" from Harry Potter, but didn't have a good idea. Until one day inspiration sparked. I decided to cover the largest of my books with fur and glue vampire's teeth to the edges, like in the movie. I found the perfect greyish black werewolf fur in a shop and the perfect yellowed teeth in the super market. Then I wrote the label with a silver pearl maker pen and fixed it to the fur with some brads that look like screws. The teeth I had to trim a bit, so they would fit better on the straight edge and adhered them with hot glue directly to the book. There is a slit in the fur there.

What you can't see in the picture: I used a shortened old belt to tie it shut. We wouldn't want our guests to get bitten, would we? 


Of course, no party could end without treat bags for the guest to take away. We filled rubber gloves with sweets and  adorned each with a plastic spider ring, that was in one of the deco packs we bought.
As you can see, Nala, the cat, was very interested - she's always were the fun is...


And at the very end: here is it all, nearly packed up. Party in a box for next year. Only 279 days to go.


Creepy Halloween greetings
Ela