Friday 31 October 2014

This is Halloween!

Hi again,

we're back from the theme park and we had a great time, even though it was definitely way too crowded. Next year we'll think of something else. But it was absolutely worthwhile.


Unfortunately my girls don't like a lot of color in  their faces, otherwise I'd done a lot more make-up. But at least I was allowed to create some hollow cheeks and darkly ringed eyes. And big hair, with spiders and everything. I love how that turned out!


Happy Haunting
Ela

Happy Haunting!

Hi Crafters,


FINALLY! It's Halloween! And the forecast is still good for tonight. I love it, when things work out. 

Today I'd like to show you another Halloween card I created. It was inspired by a sweets wrapping, with a bright full moon and some silhouetted bats. I've seen it and knew I wanted to do something similar. But while the wrapping was all in bold colors, I wanted the typical orange-burning-sky-Halloween ombre effect.


I started off by cutting the panel with the Top Note die and sponging on some squeezed lemonade distress ink for the moon and also on the bottom of the panel. Then I masked off a circle for the moon and continued sponging the ombre effect with orange, pink and brown distress inks. 

I don't own any Halloween stamp sets, so I drew the bats myself with a copic liner. I love how they turned out. Then I die cut the letters for "Haunting" with my Tim Holtz Alphabetical die. It's a great playful font, that I made more creepy by arranging the letters unevenly. I did that on the edge of a piece of masking tape, so I could adhere them to the card in one go with matte medium. That's way easier than arranging every individual letter. Then I picked a handwritten "happy" stamp and stamped it above the letters.

With the panel completed, I chose a grey card base and doodled some spider's webs in the corners with a white gel pen. As a finishing touch I used a Q-Tip to add a few spots of darker yellow ink on the moon, to make the surface more uneven, like it is in real life.

For the envelope I drew a rather large bat and wanted to leave it at that, but I didn't like how that looked. So I added the sponging after the bat, which was a bad idea. I had drawn the bat with a copic liner, but had colored it in with a Tombow marker, which smeared a little with the sponging. So I had to go very careful and stay away from the black. Also the paper is not as smooth as the cardstock I used for the card, so the envelope looks much more splotchy. But it's still ok.

I also created another top note panel for the treat bag. I did the sponging all the same, but I masked off two moons and sponged two bottoms. Then I scored it in the middle and folded it to create the top of the sweets bag. On one side I stamped and adhered the same sentiment, on the other I drew some more bats. Then I just stapled it to the clear bag.


My daughter want to give this set to their Daddy, who's taking us to the theme park today.
And one of them absolutely wanted to create the same card, to give to her sister. I love it, when they are so sweet to each other. Here's her card, though she had a little help from me. I cut the pieces, arranged the sentiment and she also asked me to draw the bats and do the assembly. But otherwise she did it all herself, including the lovely spider's webs.

She also took the picture, which is why it's a little blurry, but I think you can still see it well enough.


And something else, I've been looking forward to a lot:
Tomorrow we'll finally start with the first challenge over at Challenge up your life.


http://challengeupyourlife.blogspot.de/


I wish you all a wonderfully creepy Halloween night. 
Happy haunting
Ela


Challenges:
Simon says stamp: Anything goes
Fusion Card Challenge: Halloween  


Wednesday 29 October 2014

Simple Invitation

Hi Crafters,

a friend of mine asked me for help these days, with the invitations for her hubby's birthday. I suggested to create them for her, like I did her own in summer, but she wants to do it herself this time. 

She is a crafter, but no card maker so she doesn't have a lot of card making supplies. Besides she needs 30 invitations and wants to have them all done before Christmas, so I thought I need to suggest something simple that requires not too many supplies. And this is my idea:


I simply stamped the sentiment on a white card base and adhered hand cut triangles from scraps of paper I had left over. After the glue had dried a bit, I added true stitching with my sewing machine for a little more detail. Besides, my friend can sew so I found that fitting.

For me, it's the fist time I used my sewing machine on a card. I own just a tiny traveling machine, which can only sew straight ahead, no zigzag, no reversing, just straight. But it was easier than I thought. Maybe I should do  that more often.

I stuck to blues and greens, to make it suitable for a guy, but she of course can use anything she likes. It's just a suggestion. By the way, the green paper is handmade, it's left over from these Christmas cards I made last year. The blues are back and front of a sheet of a Christmas / Winter themed paper pad. But with these tiny triangles nobody can tell and I liked the colors together.

I don't know yet if she'll like it, but I think it could be a base. She could doodle a border, or cut a panel and adhere it to a colored card base.


Only two days to Halloween and I found a way to use at least one of the Halloween cards I created. That does make me happy. And so does the weather forecast for Friday.

Happy haunting

Ela


Challenges:
Simon says Stamp: Anything Goes
CAS on Sunday: One layer wonder
Seize the Birthday: Anything Goes Birthday

Monday 27 October 2014

Creepy bats

Hey Crafters,

this is my second post today, I have another card I created crafting with my daughters yesterday. Seems we're really in the Halloween mood now.


First I created a black card base and a vellum panel that I embossed with a spider's web. I really like this embossing folder, especially on vellum. I glued the panel to the card front, but only in the middle were the adhesive would be hidden.
 
Then I stamped the envelope and a strip of cardstock repeatedly with a chevron backdrop stamp from Lawn Fawn. I colored in a pattern with orange, dark grey and lilac alcohol markers and cut out the edges of the panel. Then I adhered it to the card with foam dots.

Having practically no Halloween stamps I decided to hand cut two bats from black cardstock, which turned out surprisingly well. I added a few details with a white gel pen to emphasize the typical shape of the wings and used some more foam dots to adhere them down.

As the card  was already pretty busy, I decided against a sentiment. 


Only 5 days 'til Halloween!
Happy haunting
Ela


Challenges:
Creative Friday: #114 Halloween
Lawnscaping Challenge: #92 Halloween / Halloween colors   


CAS(E) this Sketch: #97


Fusion Card Challenge: Halloween  

Trick or Treat

Hi Crafters,


Halloween is not traditionally celebrated over here in Germany. The shops of course decorate a lot and sell Halloween decorations and costumes. And many families with kids celebrate it too, but largely it is still considered an "American fashion holiday". Even though it is originally Irish. But I don't think that's commonly known.

Anyway, I have kids so I can wholeheartedly look forward to this year's Halloween party. Last year, Halloween fell on my very long office day, so our celebration spoiled a bit. But this year it's in the autumn holidays, and we have cool plans. We'll be going to a local theme park with the girls. They just can't wait to go, they've been talking about it daily for almost two weeks now.

So yesterday we sat down together to craft. One of them wanted to use her kid's airbrush, but the other joined me in making a Halloween card.


I created a black card base, rounded the bottom corners and added faux stitching. I knew that I wanted to use orange and lilac alcohol markers, therefore I wanted the stitching to be lilac. And my girls have a large set of cheapo gel pens in many different colors. I picked the one that matched best, but it was not very opaque on the black card stock. So I cheated and used a white gel pen as a base, covering it up with the lilac gel pen after the first layer had dried. That worked pretty well, though I don't think you can see the difference in the picture. 

Then I stamped the envelope and a panel of white card stock repeatedly with a border stamp from TAWS. After the ink had dried, I randomly colored individual dots with alcohol markers in Halloween colors.

After I had finished I cut the panel in two, rounded two corners of each and punched five evenly spaced holes to each. Then I laced the two parts together like a shoe and tied a bow. I added both panels to the card base with foam dots.

Then I used the TAWS Monster Mash set to create the top and face of the ghost. The bottom part is hand drawn. I fuzzy cut it out and colored it just a bit with alcohol markers, to give it some dimension, before I adhered it to the panel.

For the sentiment, I used one of my daughters stencils to draw the speech bubble. Then I stamped the German sentiment Süßes oder Saures (which means Trick or Treat) and colored the whole thing with alcohol markers, to pull in the lilac.


Have a great day
Ela


Challenges:
Creative Friday: #114 Halloween
Fusion Card Challenge: Halloween


Sunday 26 October 2014

Underwater thoughts

Hi Crafters,

and happy Sunday. I used two more of the acrylic block stamped panels I created last night, to create a very simple one layer card and matching envelope.


I used greens and blues on the clear block and because I laid the panel on the (finally turned on) radiator to dry, my panel got three slightly angled darker streaks. These reminded me of sun rays shining through water, especially after I had stamped the black plant silhouette. So I decided that's what it is, an underwater card.

I added a simple sentiment and a few drops of glossy accents and adhered it all to an off-white card base. I chose off-white, because my watercolor paper isn't bright white either.

Then I decided to use another of the panels to adhere to the front of the envelope. I would have preferred if the envelope had been one layer too, but I don't have large enough sheets of watercolor paper.


Have a great day
Ela


Challenges:
Just add ink: #237 Clear block stamping
CAS on Sunday: #45 One layer wonder


Saturday 25 October 2014

Creepy autumn tree

Hello Everyone,

I didn't get around much crafting this week, so I missed out on quite a few challenges that I had planned to join. Therefore I wanted to do some this week-end, because there's still holidays next week and we have a lot of non-crafty things planned...


For this card, I used the acrylic block stamping technique and created quite a few panels that I am still planning to use. The panel that inspired me most was this one. When I pulled up the block, the ink looked very much like a tree, and I knew when it dries the effect would be lost. So I quickly added some brown distress ink with my water brush. Unfortunately, when it dried it blended too much for my taste, so I traced the tree again with some more brown after it had dried.

As I hadn't managed to stamp the block straight, I had to cut down my panel and to hide the fact that the rectangle itself isn't quite straight edged either I adhered it to the craft card base (stamped tone-in-tone with a burlap background stamp) at an angle. 

I added a sentiment in dark brown ink and created a matching craft envelope with my envelope punch board. Rather simply made but the colours look rather dramatic, I think.


Have a great week-end
Ela


Challenges:
Just add ink: #237 Clear block stamping
Simon says stamp: Use Kraft

Boo

Hey Everyone,

hope you are all good.
I am still not well, but much better than yesterday. And as my girls are at a soccer game with half the family I grabbed the chance to create another card today. I haven't done much crafting last week, with the girls home from school while I had to work.

Inspiration for this card struck me two days ago at Ikea. We went there to finally buy a carpet for the kitchen table. The floor is so cold there, because there's no basement under that part of the house, and we're all suffering from cold feet with every meal. When we were already on our way back out, my girls found a Halloween lantern they absolutely wanted, which inspired me to my card. I put it on the picture, hope you can see it well enough.


Over here in Germany, Halloween is no holiday that anyone sends cards for, therefore I hardly ever make any Halloween cards. Which is a pity, because I really like all the cute spooky Halloween stamp sets and papers out there. But I just don't see much sense in creating cards that will never reach any recipient. 

Anyway, this cute lantern really made me want to create a creepy eyes card. I chose a black card base and a panel of orange cardstock. Then I cut another panel from vellum, embossed it with my beloved spider's web embossing folder and adhered it all together, making sure to use adhesive on the vellum only where it would be hidden.

Then I cut myself a stencil for the eyes, applied Versamark ink through the stencil and heat embossed them in white. That didn't turn out as neat as I would have liked, so I used a white gel pen to touch up some (many) spots. 
Then I chose some lilac cardstock, die cut a Boo with my Tim Holtz Alphabetical die, added a few highlights with the gel pen and adhered it to the black panel so the letters overhang a bit. Then I added the panel to the prepared card.

I also created a matching orange envelope with my envelope punch board and embossed another pair of creepy white eyes on the inside as a surprise.


Hope you have a great week-end
Ela


Challenges:
Creative Friday: #114 Halloween
Addicted to CAS: #50 Vellum
Freshly made Sketches: #159
Fusion Card Challenge: Halloween
 

Friday 24 October 2014

A spring card


Hey Crafters,

Only two month to go to Christmas eve. I am already in a pretty Christmassy mood, and bought the first gift this week. Unfortunately I can’t wrap it yet, because I haven’t yet found the perfect wrapping paper.

Opposed to anything  the season suggests, I created a spring card last night. Don’t ask me, probably purely wishful thinking. It’s gotten so cold, and I am not yet ready to turn on the heating yet. And I’m under the weather at that.


I got this patterned paper cheap at am outlet sale and wanted to use a bit of it. So I adhered two strips of the paper along the edges of my off-white card base, a small one with the striped pattern and a larger strip with the insects pattern.

To match the PP, I pulled out the tiny insects stamps from the Avery Elle set “more stories” and stamped a border along a piece of watercolor cardstock. I tried my best to match the colors, so I used a light grey ink for the outlines and water colored the wings with an antique linen distress ink. Then I cut off one edge along the insects and popped up the panel on my prepared card base.

For the sentiment  I stamped a banner on a leftover piece of the same watercolor cardstock, colored it with antique linen and fuzzy cut it out. I added this with more foam tape and as an afterthought added another bug and a small dotted line near the banner. That was risky, but it turned out ok.

The envelope is created from the same patterned paper.

Hope you like it.

Have a great week-end

Ela


Challenges:
Less is  more: Week 194 Little creatures
Stempelküche:  Challenge #5 Designpaper / Patterned Paper

Monday 20 October 2014

Starry birthday


Hello Everyone,

Another week has started. Over here where we live, the kids are on holidays for two weeks now. I am glad to have them home and spend more time together, but unfortunately I got only one week off, so this week I still have to work. 
That’s not quite so relaxed, because in addition to a bored cat who wants me to play with here when I have to work, I now also have the girls as my desk every 10 minutes wanting something or other. I tried getting the kids to play with the cat, which works fine for about 10 minutes, but after that my girls get bored while the cat is still very enthusiastic about the game.

Anyway, I’d like to show you another card I created this week-end.

I tried out the faux embossing technique with this. A lovely technique, though a bit messy, depending on how large your die cut is.

I die cut heaps and heaps of stars with the Paper Smooches stars dies and adhered them randomly all over the card base. Then I die cut the sentiment, also with Paper Smooches dies, and colored them with alcohol markers.

To round it off, I adhered a few random sequins in matching colors all over the card.

As usual I embellished the envelope to match with more stars.


Hope you have a great week
Ela


Challenges:

Make the day special: Try a technique
Seize the Borthday: Anything goes
Paper Smooches: Anything goes

Sunday 19 October 2014

Merry Christmas

Hi Crafters,

I haven't been up to much this week unfortunately, at least not in crafting. It's somehow been a busy week. 

But last night I found myself a little craft time and created this card.


I've used  the stamp set a lot lately, but hardly ever did I use it as intended, with the tree. I mostly used the tiny images. So this time, I wanted to really trim the tree.

I started off by stamping out lots of the small images and the tree and coloring them with alcohol markers. I took a very long time trying to blend the greens of the tree and in the end I wasn't at all happy with it. But I decided that the ornaments would probably cover enough. And they did. 

Then I die cut all the images and arranged them on and under the tree. I used the pieces that were left over to embellish the envelop as well. 

I ran the front of the card base through a snowflake embossing folder and used distress inks to watercolor a little shadow underneath the tree. It's mostly covered by the gifts, but you can see it a little. The banner was cut out from red cardstock and white embossed with the sentiment. Then I added faux stitching and a candy cane to the banner and adhered it to the card base, flat on the top and popped up just a little on the bottom.


Have a great Sunday
Ela

Wednesday 15 October 2014

delightful & happy


Hey Crafters,

Last night I had a definite low in creativity, I felt totally uninspired. I do hope this will not be the new trend. I’ve been creating so much lately and I really enjoyed it.
Well, I’m still not feeling too hot either, so maybe that’s connected. We’ll see.

I did manage two cards after all, though they were not what I originally set out to do.


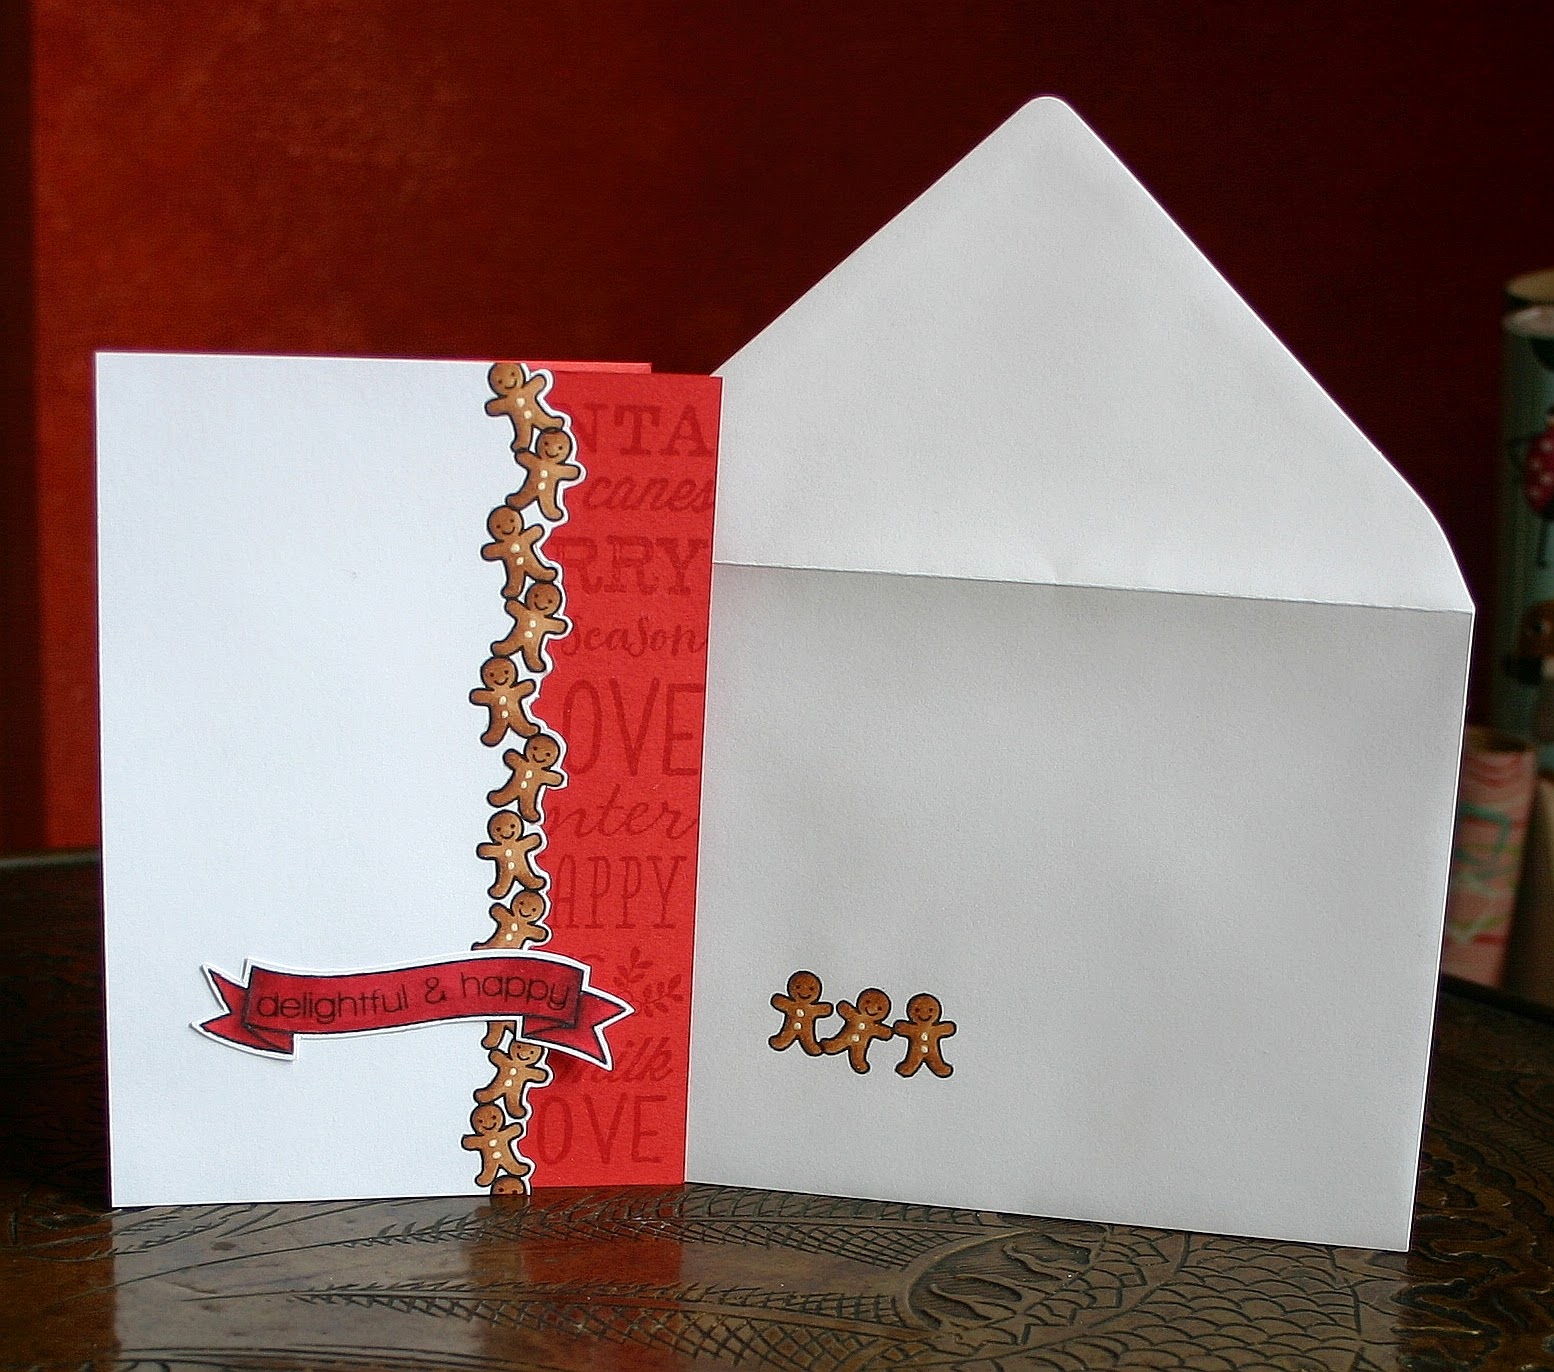
I used a Hero Arts background stamp and some Versamark ink to create a tone on tone look on the card base. Then I stamped a border of tiny gingerbread men along the edge of my white panel and colored them with alcohol markers. I added little white dots for buttons with a gel pen and cut off the right edge following the line of the gingerbread men, leaving a small white border.

Then I stamped and cut out the sentiment and banner and colored the banner as well. To be honest: I colored about a million banners, because I wanted it to match the red of the cardstock, but it didn’t work out the way I wanted. In the end I just picked one and went with it. But I think it might have looked better with the sentiment embossed in white. The banner is a bit too dark for a black sentiment.

You can’t see it well on the picture, but the panel is popped up with foam dots and the banner is flat on the panel, because I didn’t want too much dimension.
 

For the second card I wanted to use the same idea, but change it up a little. I used craft cardstock, mainly because the not matching reds had annoyed me so much. But also because I thought craft world be really cool to go with the red one as a set. For the same reasons I picked the tiny sock for the border and colored it with red and a little grey for the white area.

The Versamark ink didn’t stand out as much on the craft cardstock as I had expected, so I clear embossed it. I really like how that turned out. And this time I popped up the banner, but not the panel.

To jazz up the envelopes I just used the same stamps and colored them.


Lots of love
Ela


Challenges:
Virginia's View: clean & simple
CAS(E) this Sketch: #96