Tuesday 30 September 2014

Another cuppa

Hey Coffee Lovers,

the Coffee bolg hop inspired me, to create another coffee card, even tough the hop is already closed and I can't upload my card anymore.

As I said yesterday, I only have one coffee related stamp, the Lawn Fawn winter fox, with the little cup. I love the image, but I wanted to use something different, so I drew my own mugs with a copic multiliner. Then I colored them with my spectrum noir markers. Quite simple coloring, nothing too fancy.

For the coffee I used a tombow marker, I don't have a dark brown alcohol marker.


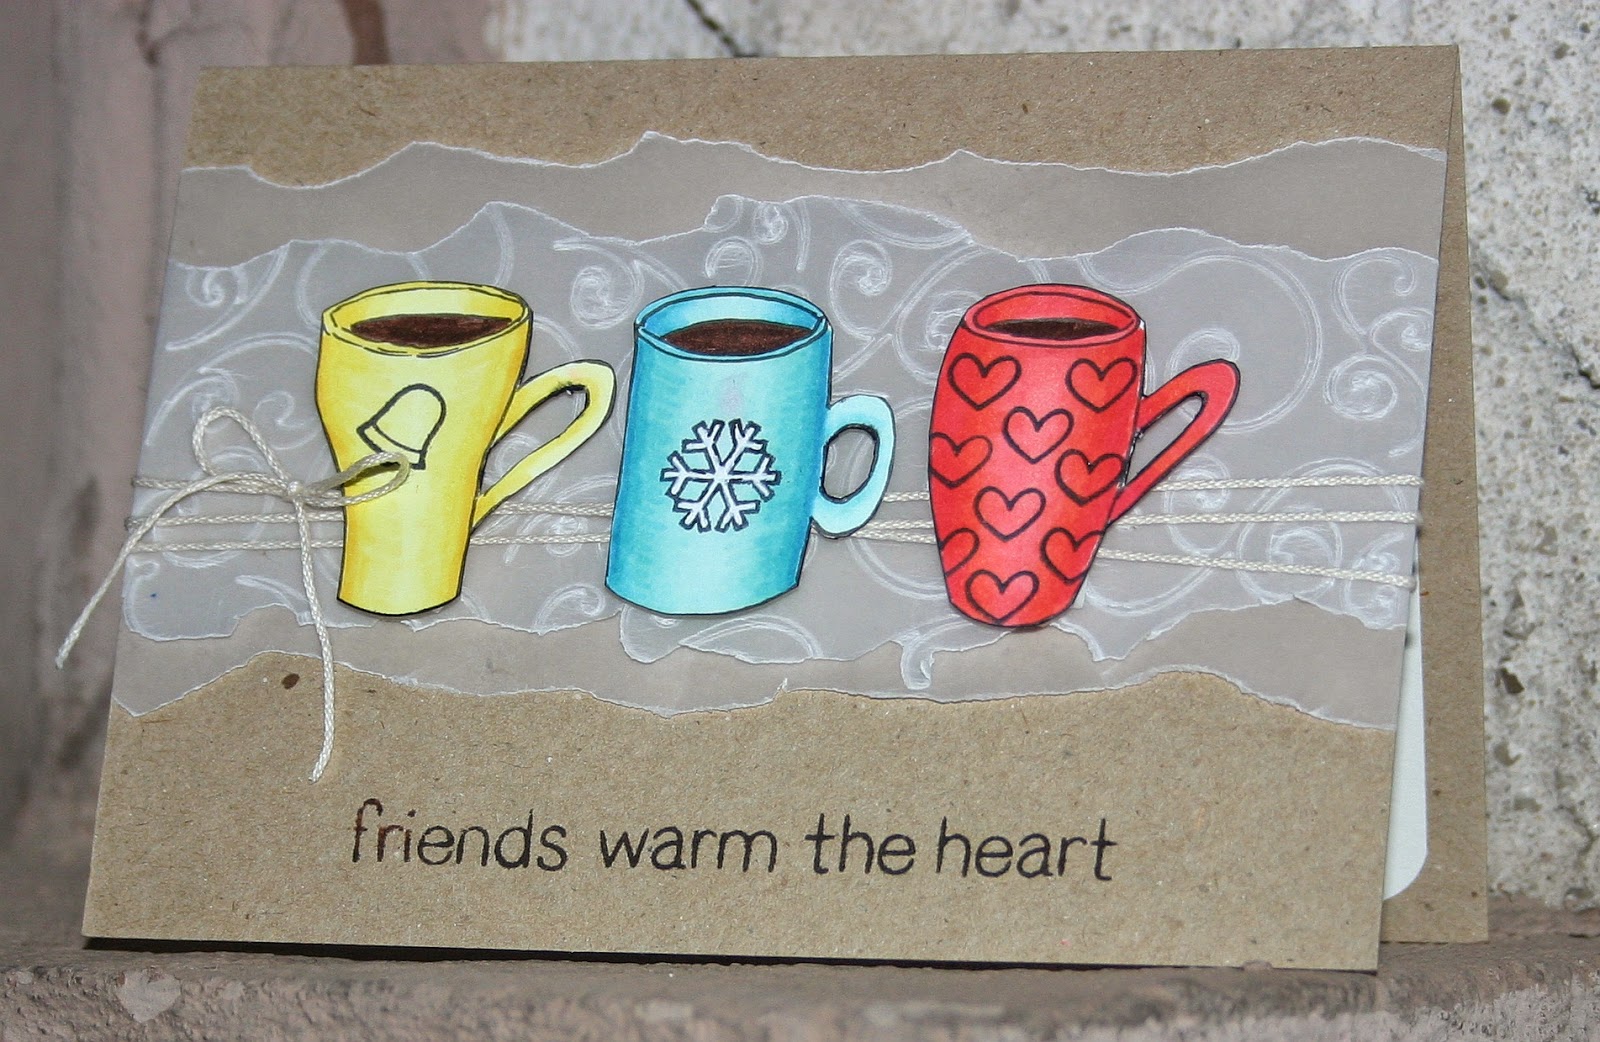
With the cups colored and fuzzy cut, I didn't quite know what to do with them. I had a line of brightly colored cups in mind when I started out, but no clear view on what to put them. Then I thought I'd like some steam coming from them and pulled out a swirly embossing folder and embossed a torn strip of vellum. That looked nice, but too subtle, so I added a second layer of torn vellum behind it and tore my embossed piece a little slimmer. Now unfortunately it doen't look like steam swirls anymore. 

In the end I played with the pieces quite a bit, until I finally assembled the card, all the while thinking that I'm not quite happy with it. I was rather surprised, that I liked the card after all, when it was done. 

And what do we learn? Never dump it, just go on! You might surprise yourself.


Hugs
Ela


Challenges:
Simon says stamp: Anything goes

Monday 29 September 2014

Coffee to warm the heart

Hey Crafters,

did you see, Chaitali has an open blog hop right now over at her blog. I absolutely wanted to participate in it, even though I've returned home from a long day at work to whining daughters (don't ask me, they 're not willing to talk about their "stupid day")...

So despite my current lack of creativity I pulled out my only coffee related stamp and one of my prepared cardbases with embossing paste and started stamping and water coloring.


But it turned out all wrong, I was too impatient at one point and didn't wait long enough, so the blue bled into the orange. Then I wanted to adhere sequins, but I don't have white ones and I don't think I would have liked blue, so I used a Perl Pen to create some pearlescent faux enamel dots. Which didn't turn out righ either, they were way too pointy. 

In the end I wasn't happy at all and started over. This time I colored the image with my alcohol markers. I am not good at that at all, but as I had messed up watercoloring I went for it anyway. I also scratched off the dots and replaced them with dots from a non perlescent white fluffy pen, which looked much better and not pointy at all. 

As I didn't have a warm grey and didn't want to use cool grey to create the shadow I used antique linen distress ink and a tombow blender pen to ground the fox. 


So, have a cup of coffee and good night
Ela


P.S: I replaced the original picture with a daylight shot, as promised. I also cut off a tiny strip at the bottom and rounded the corners again, so the embossing paste would go all the way to the edge. And I created an envelop with antique linen distress ink. I am leaving the original picture in the post, to avoid messing up the linkup of the blog hop.


Watercolored smpathy card

Hello there,

I have another sympathy card to show you, this time using my favorite watercolor medium: my inktense pencils. But I think with a different sentiment that would also work for a happy occasion.


I started with wetting my watercolor paper with irregular edges. Then I started out with yellow in the middle, bringing in the colors in rainbow order one after the other. I made sure they blend a little, but not too much. After it had all dried I brought in another layer of color and let it dry again.

Then I die cut the flowers from white cardstock and and also from the watercolored piece, so I could inlay the white ones. I mainly did that to avoid having to glue on the stems, that's always such a mess. At last I stamped the sentiment from a German stamp set.


Have  a nice day
Ela


Challenges:
Simon says stamp: Anything goes
Creative Friday: #112 One layer card

Friday Mashup Glamette


Hello Crafters,


I had such a nice surprise this morning, when I checked my e-mails. I won the Friday Mashup Glamettes badge with this card:


Thanks so much to the team for picking me, you have improved my day so much!

Love

Ela

Sunday 28 September 2014

My imaginary chameleon

Hey there,

hope you're all fine.

We had the best day today, at a local corn maize. Getting lost about a million times. The weather was perfect and the people we met all nice. It was great.

And we even came back in time to finish the card I had started in the morning.


I used my new graphic stencil to apply Versamark ink and heat emboss with clear embossing powder. I love how that looks on craft. I got the idea from Anni, thanks! 

The chameleon is watercolored and fuzzy cut with a small white border, which I had to touch up quite a bit with my white gel pen. I used the wrong sort of watercolor paper for him. It's the cheaper one, which doesn't handle water as well as my more expensive one. 

The sentiment is heat embossed in black on some torn vellum. I really love that sentiment, it says "My imaginary friend said you're special". Because I didn't have any layer to hide the ends of the vellum under, I adhered two pieces of thin, off-white paper with rounded corners to the insides.

For the envelop I sponged on some antique linen and vintage foto distress inks with the same stencil. 

I really like how the card turned out, even though I am not entirely happy with  my coloring, I think I could have done that way better, if I hadn't been in a hurry.


Have a good start in the new week.
Ela


Challenges:
Simon says stamp: Anything goes

Thursday 25 September 2014

Cheers

Hello Crafters,

I treated myself to a cool now graphic stencil, and when I received it in the mail, I wanted to try it out straight away. So I started watercoloring with my inktense pencils, but without a big plan in bright colors. 

 Unfortunately I hadn't adhered it to my watercolor paper and the colors crept underneath a bit. So I decided to outline the colored fields in black, to define them better.

When I was done, I didn't like lower part of my coloring, so I cut it off along one of the white lines and ended up with a rather small panel, that I liked a lot.

So I decided to cut off a bit more to make it square and adhere it to a black cardbase. Then I die cut the word Cheers (Paper Smooches) several times from white cardstock and once from black and stacked them to raise up the sentiment and give it some dimension.


Then I created an envelop with my envelop punch board and sponged on some grey shadow ink with the same stencil. I added faux stitching to the address area to define it a bit more.


Hope you all have a great day.
Ela


Challenges:
Simon says: Anything goes
Paper Smooches SPARKS:  Anything goes
Keep it Simple: #49 Keine Stempel / No stamps

Crazy for CAS: #53 Inspiration picture


Wednesday 24 September 2014

My imaginary friend

Hello Everyone,

today my daughters sleep at their grandparents, because their Dad and I have a school appointment. And as I was very tired all day, I thought I'd take a nap after work. But life got in the way, I had heaps of work all day and a bad network performance, so I had to wait a lot, which resulted in a much longer workday than I had planned.

So I skipped the nap and did some crafting instead. I probably just needed an outlet for my work frustration.

I felt entirely without inspiration, until I found the panel with the pink embossing paste, a leftover from the cards I made for the fusion challenge. I wanted to use it up, and found a simple sketch I liked, to go with it.

I cut a cardbase to fit it, because it's slightly smaller than a normal cardbase. I cut out a tag shape and stamped the monsters on it, masking of the ones I wanted to go in front. Then I water colored all the  monsters in grey, except the central one, which I colored in bright pink. Then I stamped the sentiment and I added some googly eyes and a tiny black mat and adhered it all to my cardbase with foam dots.

Hope you have a great day
Ela


Challenges:

Freshly made sketches: #155

A sympathy card

Hello Everyone,

remember my (kingfisher) bird stencil? I have a similar one with flying swallows. And as I myself was surprised at how much I like the kingfisher I wanted to try out the other stencil as well. 

I used it with embossing paste on a grey cardbase, added some faux stitching and a simple stamped sympathy sentiment and that's it.


Very simple and straight forward. I think the birds don't stand out a lot, but on the other hand a sympathy card should be rather subtle, shouldn't it?


Lots of love
Ela


Challenges:
Friday Mashup: Stitching

Tuesday 23 September 2014

Merry Christmas

Hello out there,

it's almost Christmas. Ah, well, not yet, but I started preparations. The first cards are made, I have an idea for a mass production family card, we even talked about the first wishes already within the family. I am very resolved, to get it all done early, so that I can for once enjoy the Christmas markets and decorations and everything, without having to worry. 

Well - we'll see...

I created two Christmas cards, with my prepared cardbases. For the first I die cut several different sized snowflakes from contrasting patterned papers (by Authentique) and stacked them onto each other. I added two smaller snowflakes and a few drops of glossy accents and a German Christmas sentiment. I also adhered a snowflake to the inside and 3 to the envelop.


For the second  card I used the same patterned papers and die cut a Christmas tree from the greyish-teal paper. I added a mat and die cut the sentiment from the red paper and also added a few droplets of glossy accents.
For this card I left the inside blank and added embossing paste to the envelop.


They both aren't my favorite cards ever, but I wouldn't trash them either.

I like the idea with the snowflakes, but I think I should have picked different papers maybe...


Hope you have a great time
Ela


Challenges (Karte 2):
Keep it simple: #49 Keine Stemplel / No Stamps

Monday 22 September 2014

A Fall card

Hi Crafters,

I liked the stenciled embossing paste on white cardstock that I did the other day a lot and wanted to use it some more. So I prepared several white cardbases with it, to use it in the next days (probably weeks) with different focal images. 

I also created two on craft card bases and (on my daughter's request) one teal one on white. 

I haven't used them all up yet, but I already created two Christmas cards (that I didn't photograph yet) and a fall card with these card bases. Today, I am showing you my fall card.


I used a Bo Bunny pumpkin stamp and colored it with copics, once again realizing that I really should do the OOC about copics. Yet I've read that you  need to print out practice images for it and I can't to that, because my printer's ink bleeds like hell with copics and watercolor alike.

Anyhow, this pumpin is pretty busy with all the type and doodles, so I reckon my inexpertly done copic coloring is not so obvious.


I stamped the sentiment in white and black to create a kind of shadow and added a few drops of glossy accents. The envelop is stamped with the same pumpkin in grey.


Hope you have a lovely day
Ela

Saturday 20 September 2014

Another Kingfisher card

Hello Everyone,

I created another kingfisher card with my bird stencil. This time I used embossing paste though the stencil. 
After it had all dried I re-attched the stencil over the bird and colored it with distress inks. This way the bird is raised up just a little. I really like the effect and feel of that.

I also sponged the same bird on the envelop, but without the embossing paste. 

The sentiment says "With best wishes", so it can be used for almost any occasion and it's stamped in Vintage Foto ink to match the branch.

I adhered the panel to a blue card base, to match it with the colors on the bird. I really like how that coordinates. 


Hope you have a great day
Ela


Challenges:
Stempelküche: Schablone / Stencil

Friday 19 September 2014

Embossing paste and watercolor

Hello Everyone,

I absolutely wanted to try the technique Jennifer McGuire showed a few days ago, watercolor on embossing paste. So I created a panel with blue and green tones, that I liked a lot. But when it had all dried (a day later) I was a little at loss what to do with it.

I decided to combine it with some vellum and die cut feathers, so here it is:


I hadn't planned it, but in the end it turned into a rather free interpretation of the "Make the day special" sketch. 

 I stamped and heat embossed the sentiment on a strip of vellum. The feathers are also cut from vellum. For the first version I had the circle in white and the feathers colored with distress inks, but I didn't like the harsh white circle, so I sponged it in soft pool. But now the colored feathers were quite lost, so I cut them again to have them non-colored. I added some rhinestones for some bling. 


I adhered another vellum feather to the inside and cut the feathers again from fun foam to use as a stamp for the envelop.

To be honest: That's not one of my favorite cards, it somehow just didn't work out  how I imagined. Maybe I like it better tomorrow. Or maybe I should add a small white mat to the colored panel? I'll think about that.
What do you think? Any suggestions? My Ex hubby said he liked it. But on the other hand, we're friends, he'd shamelessly lie so as not to hurt my feelings...


Hope you have a great day
Ela


Challenges:
Stempelküche: Schablone / Stencil
Make the day special: Sketch


Stars and embossing paste again

Hello Everyone,

I love my new embossing paste, it's so much more fun than the old structure paste I had. I wanted to play with it some more, and try an ombre effect. When I thought about the color combination, I remembered the current Fusion challenge and went for bright pink. 

I also used my stars dies again, and created two cards, because I colored too much paste.


I stenciled on the paste, trying to create a nice ombre. I think I still have to practice that a bit. When it was dry, I arranged the stars and sentiments, which are all die cuts. I also added some stars to the envelops and insides.


By the way, this card was inspired by some older cards I made, which in turn were inspired by a card showcased in the stenciled online class. I can't show you the latter, but mine are these:


Background Gelli plate print
Background: Spray ink
I really like the stencil in combination with black stars and die cut words. 


Have a great week-end
Ela


Challenges:

Creative Friday: Sterne / Stars
Stempelküche: Schablone / Stencil
Keep it simple: #49 keine Stempel / no stamps
Fusion Card Challenge: Shiny Pink 


Thursday 18 September 2014

More stars

Hi again, 

here's the last card I created on Wednesday. I die cut some stars for the previous card from a piece of scrap cardstock. And because I liked the negative panel that was left over, I wanted to use it. 


 I covered the card base with some patterned paper from a Christmas paper pad. Then I cut the panel a little smaller, added 3 more negative stars and fiddled a lot with the sentiment. It turned  out I don't have a nice little "Merry" in any of my stampsets. 


So I changed my plan, die cut the word from craft cardstock and stamped the "Christmas" with black ink.

At last I popped up the panel on some foam squares and added a few red and gold sequins. 

Then I picked a red envelop, but the color was not quite dark enough. Therefore I sponged on a little antique linen ink to darken it just a bit. I wanted to adhere a little panel for the name and address, but didn't want it white, so I sponged some more of the same ink. Now the color matches the small stripes on the patterned paper quite well.


I also added a few stars to the envelop and the inside.


See ya all
Ela


Challenges:
Creative Friday: Sterne / Stars

Embossing paste is my new Star

Hello there,

I had a creative night last night and created another card for a challenge (actually 3 challenges).

I wanted to use the sketch from Make the day special, because it is so cute and simple. For the shape I die cut lots of stars and sponged and stamped them in orange and blue. But when I arranged them on my card, I liked them so much on the white, that I didn't want to add patterned paper or stamping... And then I had an idea...


I used a stencil and my embossing paste to create some white on white texture on my cardbase. Then  and arranged them on my card, stamped the sentiment and added a little glossy accents to some of the stars.


The inside and envelop are also embellished with the same stars, to make them match.


I love how it turned out, the white embossing paste on white looks great. I think I'll do that more often in future.
 
Hope you have a great day
Ela


Challenges:
Creative Friday: Sterne / Stars
Stempelküche: Schablone / Stencil
Make the day special: Sketch


Autumn leaves

Hi Crafters,

the beautiful sunny days this week made me want to do more autumn cards and besides I still had my stitched leaves die out. 

I created a watercolor panel with autumn colors and die cut the leaves out of a smaller panel. The top panel is popped up with foam squares. The sentiment is stamped in dark brown ink, because black would have been too hard.


I also adhered another leaf on the inside and the envelop, to make them match.


Wishing you a golden sunny autumn
Ela


Challenges:
Friday Mashup: Create a card with leaves

Wednesday 17 September 2014

Golden Autumn

Hey Crafters,

this week we finally get some nice weather over here, is warm and sunny, but not too hot. Lovely. I'd like it to stay this way, 'til I am ready for some Christmas atmosphere.

I decided, that I really wanted to do more challenges, so I hopped across my challenge blogroll to see what's up. And a sketch caught my eye. I am not good with sketches normally, but  went for this one and combined it with another challenge.

So here's my card.


I sponged the leaves in fall colors and added the sentiment in dark brown ink: Then I added some faux stitching along the strip of patterned paper.

I embellished the inside with three more leaves and created the envelop from the same patterned paper. I drew on some more faux stitching and also adhered some leaves to it.


It's pretty straight forward, but I had fun sponging these leaves. And I like how they turned out, makes me want to take my kids to the woods for a walk.


Have a golden day
Ela


Challenges:
Friday Mashup: Create a project with leaves
clean & simple: #307 Sketch


Tuesday 16 September 2014

Dusty Crophopper

Hello Everyone,

today my friend's son will start Kindergarten and my friend feared that he might feel put in the shade by his older sister, who started school only a few days ago, with school cone and gifts and everything.

So I decided to get him a few small gifts in a little school cone and a card too. I did the same for his sister. I found a nice little cone in a shop, with Dusty Crophopper on it. 

Therefore I created a Dusty card to go with it:


I started by drawing the plane from the internet with a copic liner. I can't color anything I print, because my printer's ink bleeds with both copics and water color. Then I wet the paper all around the plane and colored it blue wet on wet. I lifted of some clouds with a tissue and added some grey shadows underneath the clouds to make them look realistic. 

I didn't like them at all at first and thought I'd totally messed up and would have to start over again, but after I added some more blue and grey and some water to blend they turned out ok. 

Then I colored Dusty in orange and grey, trying to get in lights and shadows as close as possible to my reference.

I thought about adding a sentiment, but decided against. I have none that fits, I'll just write inside what I want to say. My friend tends to keep everything, so she might even want to frame it for his room - it's "Cars" themed, so Dusty would fit in... 

I created an orange envelop to match from some cardstock I had.


Have a great day
Ela


Challenges:
Simon says stamp: Make your own background

Sunday 14 September 2014

Another bird card

Hi Crafters,

When I created my ant card, I colored too much emossing paste green for the grass, so I smeared the rest of it onto a white card panel with the well rounded stencil. I had in mind to use it as  out of focus foliage in the background for my next bird card.

I wanted to use my bird stencil with other colors, so I went for a yellowhammer look, with greenish yellow and light browns.


I didn't have enough embossing paste for the envelop, and didn't want to color any more, so I just sponged on some more green dots with the same stencil.

It's pretty much the same concept as before, but still a different look. I do like the blues better though.

I also used the time by girls spent with their Dad to re-organize my paper collection. I didn't like what I had, it neither fit my space well, nor was I finding it very convenient.

I've always wanted a wooden shelf and tought about constructing one myself. But then I decided to go for a cheaper solution and went to Ikea to get 6 packs of yellow Tjena Magazine files (there are 2 in each pack).


It fits my crafty mess quite nicely, because I already use Tjena boxes (with compartments) to organize all the little bits on my desk, like pens, scissors, brushes etc. 


I know, that looks a terrible mess, but it has a system. There are two boxes, one for my daughters and one for me. Each box has 12 compartments and each compartment has it's own kind of supplies. One for brushes, two for adhesives (all the differnt types need a lot of space), one for Gelpens, one for cutting devices, etc. I also bought a smaller box of which I use both box and lid for larger things and miscellaneous mess. And I also still use an old plastic box, just because the length of it fits so nicely.


So, that's it for today, lots of love
Ela


Challenges:
Simon says stamp: Make your own background

Saturday 13 September 2014

Starry Treat Box

Hello Crafters,

did you see the fantastic treat boxes Laura Bassen created a while ago? I simply adore them!

I absolutely wanted to create some of my own, and wish I had the same stampset. I don't, so I checked what stamps I have to replace them. I bought a set with stars and arrows a few month back, and haven't really used it yet, so I decided to take some ink to that. 

As I still had the grey cardstock out from my kingfisher birthday card, so I used it for the box and  I decided to go with a similar color combo, with teals grey and white for the sleeve:


I used The Crafty Owl's Box Buster to sized the envelop so it would fit 2 Kinder Country bars.

Dimensions:

Box                      2x5x9 cm
Paper                   14,9x14,9 cm
1st Punchline      7,5 cm
2nd Punchline     10,3 cm

I also got 2 other small chocolate bars, to check what dimensions they would need, but I can't find them anymore. I suspect my daughters found them.

Maybe I should have made the sleeve a little smaller, so you can see more of the box?
Anyway I am pretty happy with it for a first try, and I think I will make these as Christmas gifts for the teachers. I have two winter stampsets from Lawnfawn with tiny images that I imagine would fit perfectly. And I wouldn't even have to create an extra card, I could just include the sentiment on the sleeve, like I did with this one. Christmas is a busy time after all...


Hope you have a great day
Ela


Challenges:

Creative Friday: #111 Sterne / Stars

Friday 12 September 2014

Fantastic Birthday Wishes

Hello out there,

today I'd like to show you a card, I created with a digi stamp from a new German stamp company, create a smile.

I simply love how this card turned out, I am feeling very creative right now. When I first thought of it, I imagined the ant colored with alcohol markers, but frankly: I'm not  good at that. So I went with what I know: Inktense pencils. I am really glad I bought them and also that I chose the set of 36, instead of a smaller one.

I colored the ant with very dark grayish brown, which I think fits quite nicely. I stamped some parcels on his back, actually from a Christmas set and colored them too. Then I used distress inks to color the embossing paste and stenciled some grass underneath the ant. At last I stamped the curved sentiment, (it somehow looks more curved in real life) to imitate an ant track.


To create the envelop, I resized the ant and used a few of the little fellows as a border. The last one got cut off by my printer, because it was to close to the edge, so drew his bottom with a copic liner.


With this card I'd like to apply as a guest designer for create a smile, though unfortunately I don't fulfill one of the requirements: I cannot like them at facebook, because I deeply distrust facebook and have no account. I hope in this case it's not mandatory.


Have a good day
Ela


Challenges:
Seize  the Birthday: Anything goes
Stempelküche: Geburtstag / Birthday
Create a smile: Guest designer call


Thursday 11 September 2014

Seize the Birthday

Hey Crafters, 

I am so thrilled, I received the Birthday Honors Badge over at Seize the Birthday:


I am so thrilled, I can't believe it. Mostly I am rather unsure about my crafts and tend to be rather critical. But this gives me the feeling that others like what I do, and that feels really, really good!

 So, here's the card I created for it:


Thanks you sooo much!

Ela

Kingfisher Birthday card

Hello Everyone,

I created this card the other day, which I liked a lot and already sent to a friend who is only slowly recovering after surgery. Now my initial idea was to use it with embossing paste, so I still wanted to do that. 

Besides, I just bought Wendy Vecchi embossing paste, because I really disliked my old structure paste, which simply isn't as nice. So I wanted to try that as well. I must say, it's really cool. Much smoother and nicer than my old paste. Not as heavy somehow.


For the new card, I cut a light grey cardbase and added some texture with the embossing paste and a stencil with irregular little dots, called "well rounded".

Then I created the bird with Inktense pencils on water color paper (using another stencil). Pretty much like the original one, though the colors turned out darker. I also went for more of a kingfisher look, with the orange belly and dark beak. I cut out the bird leaving a white border and and adhered it to the cardbase. The sentiment banner was popped up with foam dots.


This time I didn't use a store bought envelop but created my own from the same cardstock. I also added some embossing paste to the front and even across the fold lines, just to see how that worked. It seems to be fine, but it would probably be better to handdeliver this envelop. I am not sure if it would pass through the mail alright.

I am surprised at how much I like this bird stencil, I hadn't expected that. I really need to try out a few other colors on it, see how that looks.


Have a great day
Ela


Challenges:
Stempelküche: Geburtstag / Birthday

I won a challenge!

Hey Crafters,

Today I want to brag a little: I won a challange!! 


Isn't that awasome? I can hardly believe it, there were so many fantastic cards, and they picked me. I am sooo happy!

So here's my price winning champion: ;)


I'd like to thank Carolin from Stempelküche and her fabulous design team!


Love
Ela